systemd-networkd-wait-online.service is a once shot service that holds the rest of boot up to wait until the network is up. This is fine for 99% of cases but it’s not fine for my USB storage that is used for diagnosing hardware problem. In other word, the reason I’m booting from this USB stick is for trouble shooting network. If you are using Network Manager, it would be fine, then again, this is to trouble shoot the netplan config file and what not. In any rate, I don’t want to forever for network to be up.
systemd-networkd-wait-online.service is the one shot service that waits for the network up and running so that’s what I have to disable. sudo systemctl disable systemd-networkd-wait-online.service sudo systemctl mask systemd-networkd-wait-online.service This is the 2nd time I googled, so it’s better to be left here.
Sadly, one of hard disks for ESXi server died. I put in a replacement disk but one of VMs doesn’t start as not having the disk. So, I need to delete the old disk node, create new one, and set up in the VM.
Before installing disk, take a note on the disk serial number. (S/N) This comes in handy to ID the disk in the process. More over, you should label the S/N near SATA port to make life easier.
Log in to ESXi via SSH as root. Then, check the disks.
# ls -l /vmfs/devices/disks
You’ll see a bunch but you should be able to ID the disk you just put in if you know the S/N. Since I’m stubborn, I want to use the same “hitachi_2tb_2.vmdk”, I first deleted the vmdk file. You actually need to delete two files.
Now time to go to the ESXi web interface and create a new disk. First, delete the dead disk from the settings. Then “Add New Disk” and pick “Existing disk” and choose the VMDK file you just created.
You are done with the VM setting. Now, go into the XigmaNAS.
First, “Disks” > “Management” > HDD Management. If you don’t see the new device not showing up, “Import Disks” [Import].
Second, format the disk you just put in. It’s “Disks” > “Management” > “HDD Format”. Pick “ZFS Storage Pool”. Choose the disk. (Serial Number shows up here as well.) Click “Next” and format. (pretty quick.)
Third, “Disks” > “ZFS”> “Pools” > “Tools”. ZFS Pool knows that the disk is changed. Chose “Replace a device” to replace the dead disk to the new one. Once you are done, it should start recovering the mirror.
Step 4: Edit Jenkins config For me, port 8080 is taken so I generally use port 9000. sudo emacs /etc/default/jenkins sudo systemctl restart jenkins.service
Quick note to myself. When you install lighttpd, install “gamin” package. Otherwise, lighttpd does not work. (I think I have been bitten by this twice already.)
As of 18.04, X11 server requires root priv to run. This made Chrome kiosk mode to complain if you run Chrome as root too. Previously, the whole X11/Chrome was running as a unprev user. Here is the service unit, and starting Chrome as normal user.
UPDATE: 2023-01-10 Chrome became not-liked app in Ubunte, and Firefox has a kiosk mode too. Switching to Firefox
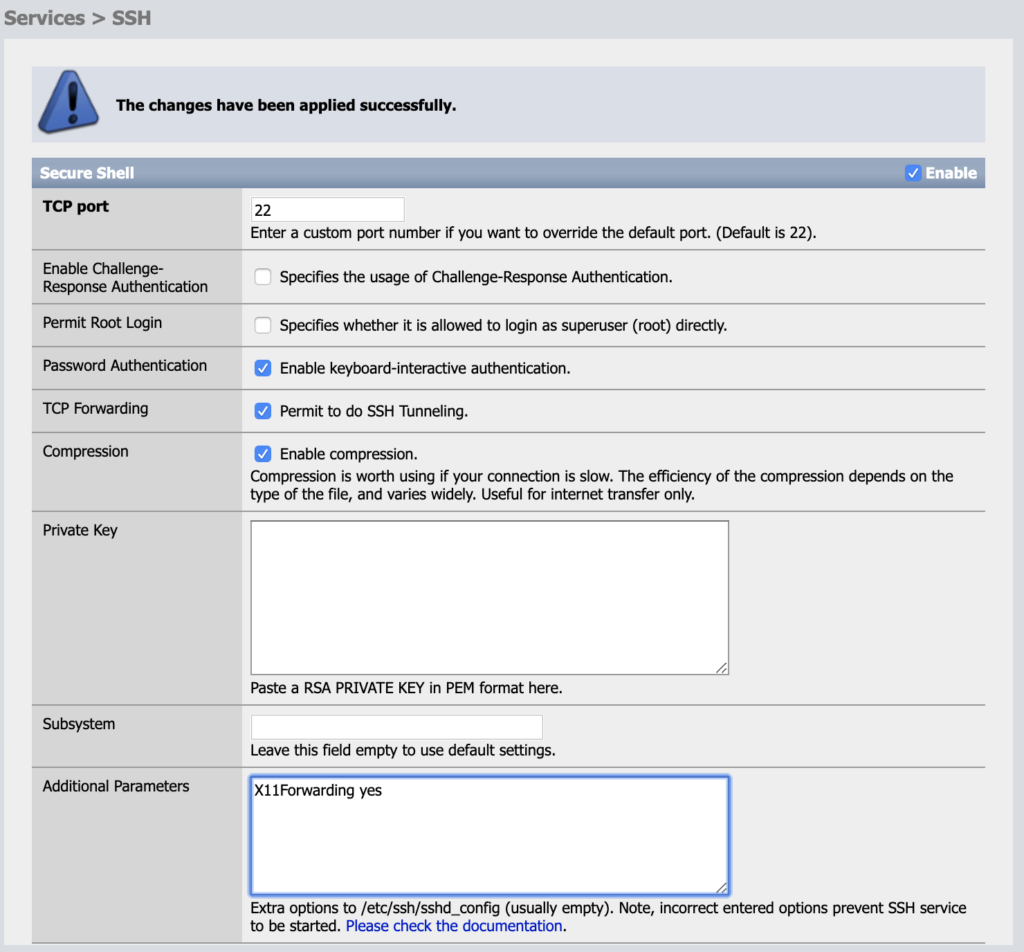
Quick note – For SSH’s X forwarding to work on XigmaNAS, you need to explicitly enable the forwarding. The FreeBSD doc says it’s default yes, but it’s not true for XigmaNAS. It didn’t work until I added the X11forwarding in the additional parameters. Cheers!
Here is the steps to run git private server on XigmaNAS.
Install git package
Create “git” account
Set up git directory
Set up the ssh public key auth for easy login
I know I can do this from the XigmaNAS web GUI’s command but it’s too tedious so please use the terminal of your choice. You also need a text editor most likely. MYVOLUME should be your data store of choice.
# pkg install -y git
# GITHOME=/mnt/MYVOLUME/git
# mkdir -p $GITHOME/projects
# mkdir -p $GITHOME/.ssh
# cd $GITHOME/.ssh
# ssh-keygen
Generating public/private rsa key pair.
Enter file in which to save the key (/root/.ssh/id_rsa): mygit_rsa
Enter passphrase (empty for no passphrase):
Enter same passphrase again:
Your identification has been saved in mygit_rsa.
Your public key has been saved in mygit_rsa.pub.
The key fingerprint is:


# cat mygit_rsa.pub >> authorized_keys
# chmod 600 authorized_keys
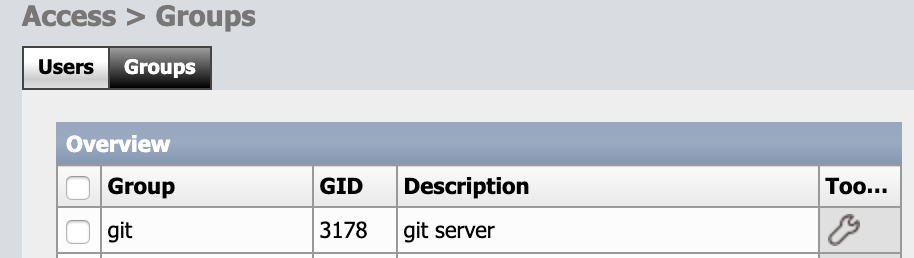
Now, you need to create “git” account. From XigmaNAS UI, Access>User&Groups, first go to Groups and add “git” group. GID can be anything so I picked a random number 3178. Then, create “git” user.
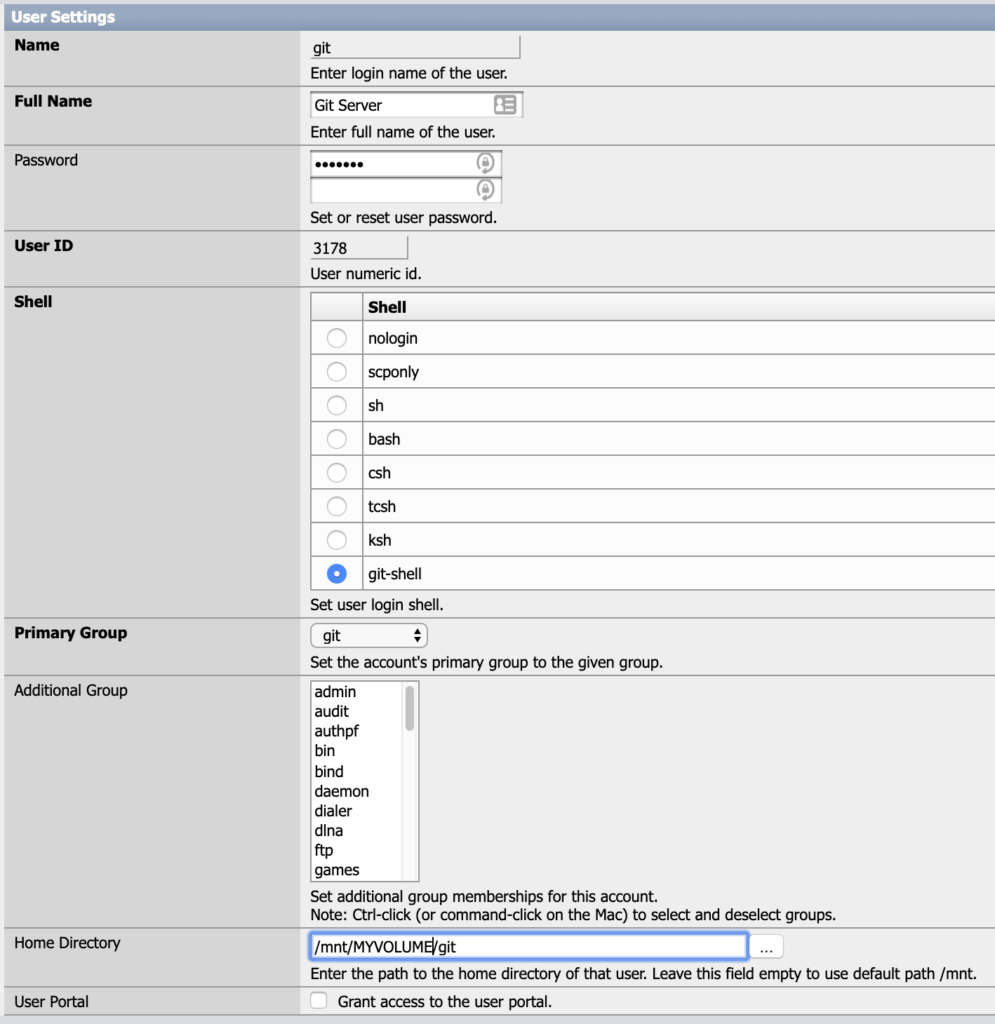
Click “+” and add “git”.“git” user setup. “git-shell” will show up once you hack a php file.
So the “git-shell”. Unfortunately, the shell selection is not picked up from /etc/shells. I sniffed around and you need to hack the php file for this to show up. You need to be root to edit the PHP file. The file is /usr/local/www/access_users_edit.php so become root and open it with a text editor. Look for $l_shell. Add a line for git-shell. Snippet and diff follow. I use ksh a lot so I added ksh as an option as well.
UPDATE: On XigmaNAS 12, /etc/inc/system/access/user/grid_properties.php contains the list of shells.
As a git server, all set. The remaining thing is to add “git” group to the users on the server so users can create new repo under projects, and handing out the private key mygit_rsa to users, or add the public key to the authorized_keys of “git” user.
Example: Let’s say I want to have a “config.git” on the server. This repo stores all my Linux machine’s configuration files so when I have to set up a new machine, I can see how I set up my account in the past. First, since I don’t know how to create fresh repo from client side, I will create a fresh repo on XigmaNAS. Here is the steps:
SSH-Login to NAS. Since “git” account is not shell account, you have to do this as root unfortunately.
Create a repo directory “mkdir $GITHOME/config.git“
Still as root, cd $GITHOME/config.git && git init --bare
chown -R git:git $GITHOME/config.git
From the client side, now repo is ready, if you set up the ssh keys right, you do: git clone ssh://git@nas/~/config.git
Quick note – When you migrate macOS disks from old old old ones. The system extensions are copied over and stored in the “staging” part. Some are used, some are not compatible.
All I wanted to do was to program an Arduino Leonardo compatible device. Loaded up Arduino but the board didn’t show up as serial device at all. I dug (aka google) a lot but couldn’t find any. Some say to check the “Privacy” part, which I did to allow the extensions to load. The problem started there. I looked at the system profile, and there were quite a few “Disabled” extensions in the system profiler. I recognize some of them. Soundflower for routing audio over network, Dymo printer, old camcorders and digicams, etc. There are a couple of “unknown” developer extensions as well, on the latest MacBook Pro.
A lesson learned. It is not always good idea to migrate everything. I managed to create a USB disk bootable with Mojave which itself was a bit of challenge. The tech moved on and using SuperDuper to make one isn’t enough anymore. First of all, I had to reformat the disk to AFPS. Then, SuperDuper can clone the disk. Then, a few more like going into recovery mode and changing the security prefs.
Anyhow, I managed to erase the MBP internal flash, did a clean install from the external disk, then only copied the user documents and not anything else. Which meant to install a few applications again. However, it’s mostly to copy apps over from the external disk to internal so not that big of deal. In the end, ones not working (likes of old Final Cut.) was left for dead.
Now, I can install the drivers. First I thought that the Leonardo uses Silicon Labs’ USB serial, so installed. No go. I hook up the arduino to Linux laptop and works just fine. Scratched my head for a while, and realized this uses FTDI USB. Downloaded VCP driver. Voila!
I put it in a paragraph here, but it was actually a two day ordeal, from creating bootable external disk to trying out Arduino on other machines to figuring out the device and manufacturer USB IDs. For some reason, the Atmel thing didn’t show up with my google-fu. So, I banged my head after loading up Silicon Labs driver.
Anyhow, after FTDI driver, hook up Leonardo. Immediately, the “this keyboard is not recongized.” dialog shows up! Woohoo!